rico is a Python package for creating HTML documents from rich content: dataframes, plots, images, markdown etc. It provides a high-level, easy-to-use API with reasonable defaults, as well as low-level access for better control.
Use rico if you want to create an HTML document from objects created in a Python script.
With rico you can avoid:
- Writing data to intermediate files or a database from a script.
- Loading data into a Jupyter notebook from intermediate files or a database.
- Using nbconvert or similar tools for creating HTML files.
Learn more about why rico was created with a quick start guide: https://e10v.me/rico-rich-content-to-html-easy/
pip install ricorico has no dependencies other than standard Python packages.
For Markdown support:
- install markdown-it-py,
- or install Python Markdown,
- or set your own Markdown renderer using
rico.set_config.
To get started with rico, take a look at the self-explanatory examples with resulting HTML documents. The user guide contains a slightly more detailed explanation.
rico provides both declarative and imperative style interfaces.
Declarative style:
import pandas as pd
import rico

df = pd.DataFrame(
    {
        "x": [2, 7, 4, 1, 2, 6, 8, 4, 7],
        "y": [1, 9, 2, 8, 3, 7, 4, 6, 5],
    },
    index=pd.Index(list("AAABBBCCC")),
)
plot = df.plot.scatter(x="x", y="y")

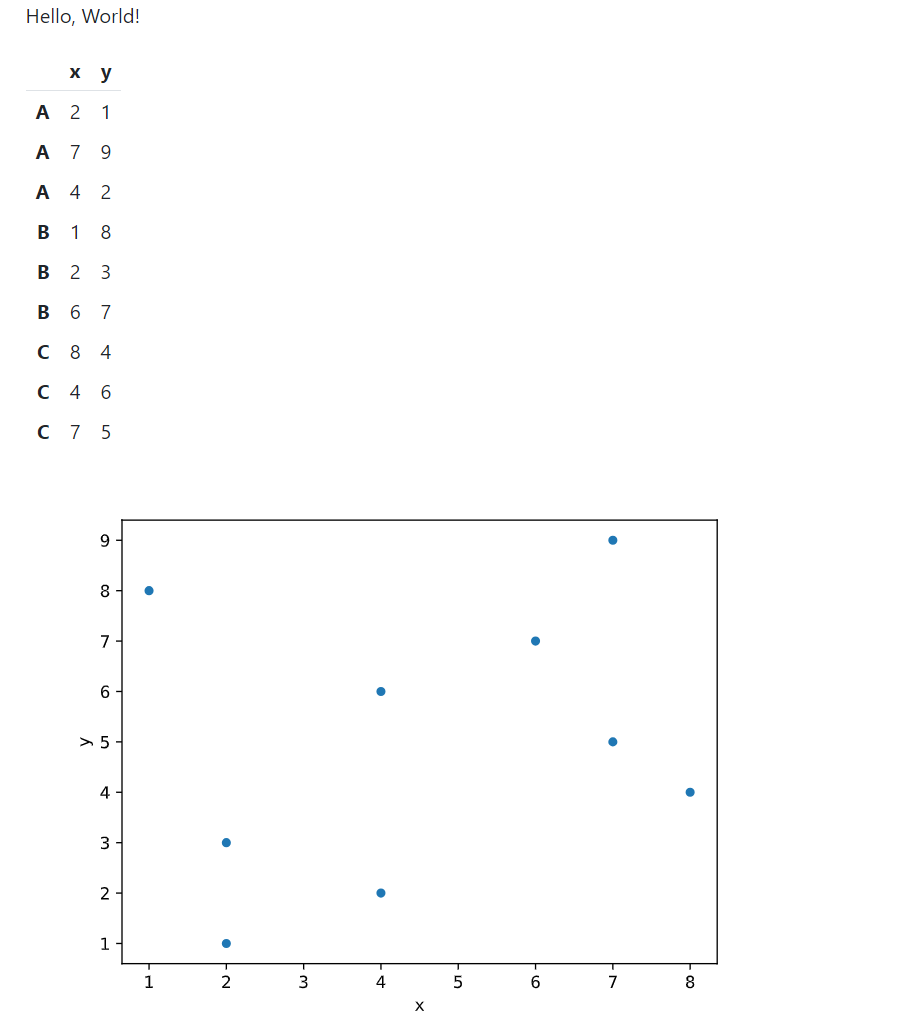
doc = rico.Doc("Hello, World!", df, plot, title="My doc")
The result:
Imperative style:
doc = rico.Doc(title="My doc")
doc.append("Hello, World!", df, plot)
Also imperative style:
doc = rico.Doc(title="My doc")
doc.append("Hello, World!")
doc.append(df)
doc.append(plot)
Mix-and-match:
doc = rico.Doc("Hello, World!", df, title="My doc")
doc.append(plot)Serialize the document to HTML using str(doc):
with open("doc.html", "w") as f:
    f.write(str(doc))
Implicit serialization:
with open("doc.html", "w") as f:
    print(doc, file=f)
Internally, str(doc) calls doc.serialize() with default parameter values. Call doc.serialize(indent=True) to indent the HTML element tree visually:
with open("doc.html", "w") as f:
    f.write(doc.serialize(indent=True))
Set custom whitespace for indentation using the space parameter:
with open("doc.html", "w") as f:
    f.write(doc.serialize(indent=True, space="    "))
Remove unnecessary whitespace by setting strip to True:
with open("doc.html", "w") as f:
    f.write(doc.serialize(strip=True))
Control the default behavior of str(doc) and doc.serialize() using the global options indent_html, indent_space, and strip_html:
with open("doc.html", "w") as f, rico.config_context(indent_html=True):
    f.write(str(doc))
The default option values are:
indent_html = False,indent_space = " ",strip_html = False.
rico automatically recognizes the following content types:
ricocontent classes (subclasses ofrico.ContentBase).- Matplotlib Pyplot Plots.
- Dataframes and other types with IPython rich representation methods.
- Text.
Use specific classes for plots and text to change the default behavior:
doc = rico.Doc(
    rico.Text("Hello, World!", mono=True),  # The default value is False.
    df,
    rico.Plot(plot, format="png", bbox_inches="tight"),  # The default value is "svg".
    title="My doc",
)
The following code gives the same result as the code above:
doc = rico.Doc(title="My doc")
doc.append_text("Hello, World!", mono=True)
doc.append(df)
doc.append_plot(plot, format="png", bbox_inches="tight")
Some options can be set in the global configuration:
with rico.config_context(text_mono=True, image_format="png"):
    doc = rico.Doc("Hello, World!", df, plot, title="My doc")
Use specific classes and methods for other content types:
- Images:
ImageorDoc.append_image. - Code:
CodeorDoc.append_code. - Markdown*:
MarkdownorDoc.append_markdown. - HTML tag:
TagorDoc.append_tag. - Raw HTML:
HTMLorDoc.append_html.
*Install markdown-it-py or markdown, or define a custom Markdown renderer with the markdown_renderer global option to use Markdown or Doc.append_markdown.
For example:
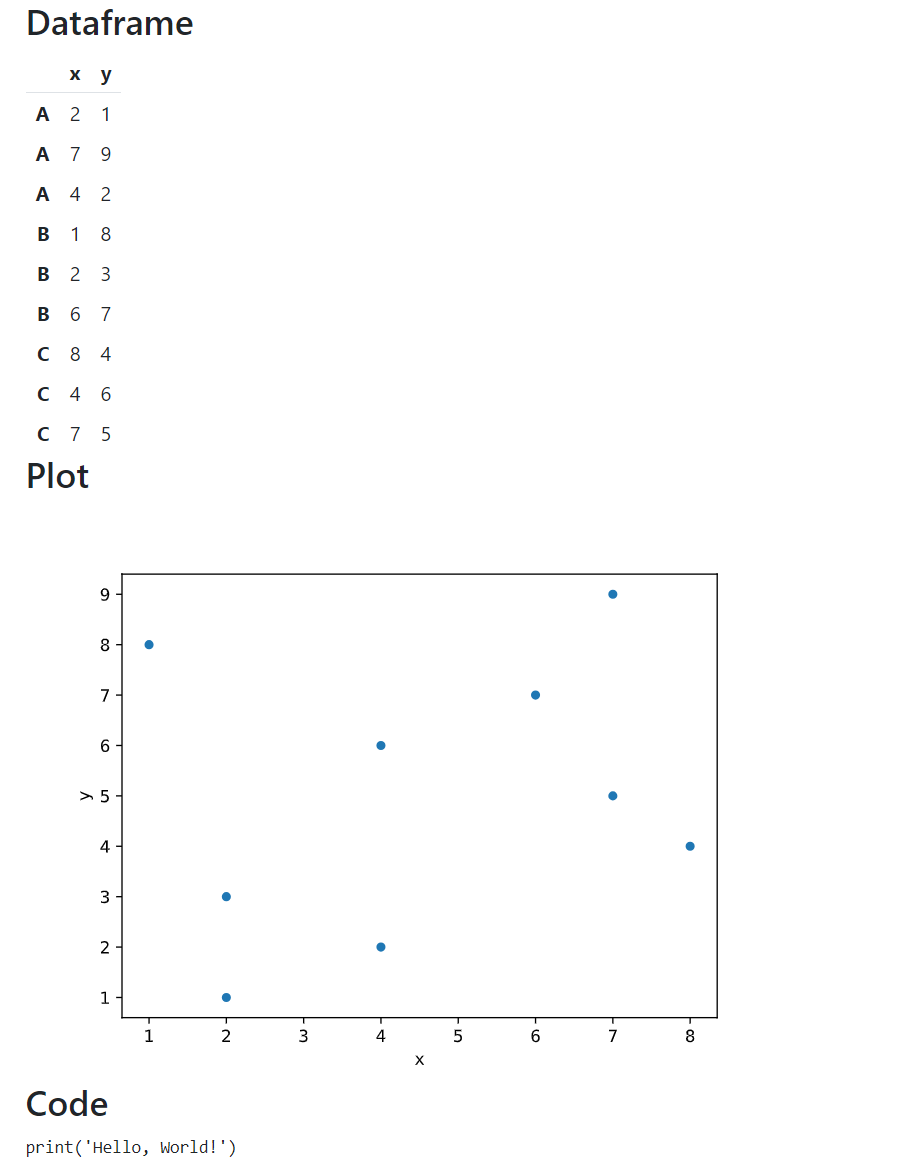
doc = rico.Doc(
    rico.Markdown("## Dataframe"),
    df,
    rico.Tag("h2", "Plot"),  # An alternative way to add a header.
    plot,
    rico.HTML("<h2>Code</h2>"),  # Another way to add a header.
    rico.Code("print('Hello, World!')"),
    title="My doc",
)
The result:
The following code gives the same result as the code above:
doc = rico.Doc(title="My doc")
doc.append_markdown("## Dataframe")
doc.append(df)
doc.append_tag("h2", "Plot")
doc.append(plot)
doc.append_html("<h2>Code</h2>")
doc.append_code("print('Hello, World!')")
Check the docstrings for details.
Serialize content to HTML using str(object) or object.serialize():
obj = rico.Tag("p", "Hello, World!")

print(obj)
# <div><p>Hello, World!</p></div>

print(obj.serialize(indent=True, space="    "))
# <div>
#     <p>Hello, World!</p>
# </div>By default, Bootstrap styles are included in the document. The resulting documents are responsive and mobile-friendly. Change the default behavior using the bootstrap parameter:
doc = rico.Doc("Hello, World!", bootstrap="full")- Set
bootstrapto"css"(default) to include only CSS. - Set
bootstrapto"full"to include both the CSS and JS. - Set
bootstrapto"none"to not include Bootstrap*.
*Keep in mind that rico relies on Bootstrap classes and styles. For example:
- The
monoandwrapparameters of theTextclass use Bootstrap'sfont-monospaceandfont-monospaceclasses. - rico's dataframe style definition uses Bootstrap variables.
Each content element is wrapped in a <div> container. Specify the element's container class using the class_ parameter:
print(rico.Tag("p", "Hello, World!", class_="col"))
# <div class="col"><p>Hello, World!</p></div>
All elements' containers in the document are also wrapped in a <div> container. Specify the document's container class using the class_ parameter:
doc = rico.Doc("Hello, World!", class_="container-fluid")Define the document layout using Bootstrap and Div class:
doc = rico.Doc(rico.Div(
    rico.Obj(df, class_="col"),
    rico.Obj(plot, class_="col"),
    class_="row row-cols-auto",
))
The code above creates a document with two columns, one with a dataframe and another with a plot. The Obj is a magic class which automatically determines the content type in the same way that Doc and Doc.append do.
Another example:
import altair as alt

doc = rico.Doc(
    rico.Tag("h2", "Dataframes"),
    rico.Div(
        rico.Obj(rico.Tag("h3", "A"), df.loc["A", :], class_="col"),
        rico.Obj(rico.Tag("h3", "B"), df.loc["B", :], class_="col"),
        rico.Obj(rico.Tag("h3", "C"), df.loc["C", :], class_="col"),
        class_="row row-cols-auto",
    ),
    rico.Tag("h2", "Plots"),
    rico.Div(
        rico.Obj(
            rico.Tag("h3", "A"),
            alt.Chart(df.loc["A", :]).mark_point().encode(x="x", y="y"),
            class_="col",
        ),
        rico.Obj(
            rico.Tag("h3", "B"),
            alt.Chart(df.loc["B", :]).mark_point().encode(x="x", y="y"),
            class_="col",
        ),
        rico.Obj(
            rico.Tag("h3", "C"),
            alt.Chart(df.loc["C", :]).mark_point().encode(x="x", y="y"),
            class_="col",
        ),
        class_="row row-cols-auto",
    ),
    title="Grid system",
)
The result:
The following code gives the same result as the code above:
doc = rico.Doc(title="Grid system")

doc.append_tag("h2", "Dataframes")
div1 = rico.Div(class_="row row-cols-auto")
doc.append(div1)
for name, data in df.groupby(df.index):
    div1.append(rico.Tag("h3", name), data, class_="col")

doc.append_tag("h2", "Plots")
div2 = rico.Div(class_="row row-cols-auto")
doc.append(div2)
for name, data in df.groupby(df.index):
    div2.append(
        rico.Tag("h3", name),
        alt.Chart(data).mark_point().encode(x="x", y="y"),
        class_="col",
    )
More on Bootstrap layout and grid system:
By default, rico includes the following styles in the document:
- Bootstrap CSS. Change the default behavior using the
bootstrapparameter of theDocclass. - Dataframe style. Change it by setting the
dataframe_styleglobal option.
Exclude dataframe style from the document by setting dataframe_style to "":
with rico.config_context(dataframe_style=""):
    doc = rico.Doc(df)
Include custom styles and scripts using the Style and Script classes:
dark_theme = "https://cdn.jsdelivr.net/npm/bootswatch@5/dist/darkly/bootstrap.min.css"
jquery = "https://cdn.jsdelivr.net/npm/jquery@3/dist/jquery.min.js"

doc = rico.Doc(
    rico.Text("Click me", class_="click"),
    extra_styles=(
        rico.Style(src=dark_theme),
        rico.Style(".click {color: yellow;}"),
    ),
    extra_scripts=(
        rico.Script(src=jquery),
        rico.Script(
            "$('p').on('click', function() {alert('Hello, World!');})",
            defer=True,
        ),
    ),
)
The defer parameter adds the defer attribute to the <script> tag if the src parameter is used. Otherwise, if the text parameter is used, the script is placed in the footer of the document.
By default, external styles and scripts are included as file links. This means that these files must be available when someone opens the document. Include the contents of these files in the document using the inline parameter:
doc = rico.Doc(
    rico.Text("Click me", class_="click"),
    extra_styles=(
        rico.Style(src=dark_theme, inline=True),
        rico.Style(".click {color: yellow;}"),
    ),
    extra_scripts=(
        rico.Script(src=jquery, inline=True),
        rico.Script(
            "$('p').on('click', function() {alert('Hello, World!');})",
            defer=True,
        ),
    ),
)
In the example above, the Bootstrap styles are still included as a link. Use the global options inline_styles and inline_scripts to include the contents of the style and script files in the document:
with rico.config_context(inline_styles=True, inline_scripts=True):
    doc = rico.Doc(
        rico.Text("Click me", class_="click"),
        extra_styles=(
            rico.Style(src=dark_theme),
            rico.Style(".click {color: yellow;}"),
        ),
        extra_scripts=(
            rico.Script(src=jquery),
            rico.Script(
                "$('p').on('click', function() {alert('Hello, World!');})",
                defer=True,
            ),
        ),
    )
Keep in mind that style and script files can contain links to other external resources. rico doesn't parse or change them, even if the inline parameter or the inline_styles and inline_scripts global options are set to True. As a result:
- These resurces should be availble when someone opens an HTML document created by rico.
- Links with relative paths to external resources will not work.
For example, Bootstrap Icons CSS contains linkes to fonts with relative paths: url("./fonts/bootstrap-icons.woff2?1fa40e8900654d2863d011707b9fb6f2"). Including this CSS file with the inline parameter set to True will make these links invalid.
Use global configuration to:
- Get or set default parameter values.
- Get or set document properties.
- Get or set a markdown renderer method.
The following global options define the default parameter values:
| Global option | Parameter | Classes, methods, functions |
|---|---|---|
indent_html |
indent |
obj.serialize, serialize_html |
indent_space |
space |
obj.serialize, serialize_html |
strip_html |
strip |
obj.serialize, serialize_html |
text_mono |
mono |
Text, obj.append_text |
text_wrap |
wrap |
Text, obj.append_text |
image_format |
format |
Plot, obj.append_plot |
inline_styles |
inline |
Style |
inline_scripts |
inline |
Script |
The following global options define document properties:
meta_charsetdefines a document charset metadata. Set it to""to disable.meta_viewportdefines a document viewport metadata. Set it to""to disable.bootstrap_cssdefines a link to the Bootstrap CSS file.bootstrap_jsdefines a link to the Bootstrap JS file.dataframe_styledefines a dataframe style. Set it to""to disable.
The markdown_renderer global option defines a callable that converts Markdown to HTML. It should accept a Markdown string as the first argument and return HTML as a string. The default value is defined as follows:
- If the
markdown_itmodule can be imported, then the default value ismarkdown_it.MarkdownIt().render. - Otherwise, if the
markdownmodule can be imported, then the default value ismarkdown.markdown. - Otherwise, the default value is
None. In this case, callingrico.Markdownorobj.append_markdownwill throw an error.
Get a dictionary with global options using get_config without parameters:
global_config = rico.get_config()
print(global_config["indent_html"])
# False
Get a global option value using get_config with the option name as a parameter:
print(rico.get_config("indent_html"))
# False
Set a global option value using set_config:
rico.set_config(indent_html=True)
print(rico.get_config("indent_html"))
# True
rico.set_config(indent_html=False)
Set a global option value within a context using config_context:
with rico.config_context(indent_html=True):
    print(rico.get_config("indent_html"))
    # True

print(rico.get_config("indent_html"))
# FalseInternally, rico uses the standard xml.etree.ElementTree module:
- Every content object (
Tag,Text,Divetc.) has acontainerattribute of typexml.etree.ElementTree.Element. The value is a<div>container element. Docobjects has additional attributeshtml,head, andbodyof typexml.etree.ElementTree.Element. They represent the<html>,<head>, and<body>elements, respectively.
Access these attributes and use xml.etree.ElementTree API to gain low-level control over the document and its elements.
Also, rico provides the following functions for working with xml.etree.ElementTree.Element objects:
parse_htmlparses HTML from a string.indent_htmlindents an HTML element tree visually.strip_htmlremoves unnecessary whitespace.serialize_htmlserializesxml.etree.ElementTree.Elementobject.
Check the docstrings for details.
- Use Jupyter Notebook for interactive computing.
- Use nbconvert or papermill if you're processing data and creating objects for a document in a Jupyter notebook.
- Use Quarto if you prefer R Markdown style notebooks and a variety of output formats.
- Use xml.etree.ElementTree, lxml, Yattag, or Airium if you need low-level control.
- Support math equations with MathJax and/or KaTeX.
- Support PDF content.
- Create docs with MkDocs and Material for MkDocs.


